
Latest notes:
Atlas notes: the blog.
Jul 3, 2020
After a chat with IWPOTY on a livestream yesterday, I wanted to write up a post on the topic of editing, how I edit, and as a judge of the International wedding photographer of the year 2020, what little bits of TLC our judging panel will be looking at as we go over your submissions.
As our beautiful craft has become democratised and we can all be photographers, the by-product of that is a temptation to lean away from the craft-centered approach that held up all the photography that defined how the 20th century was recorded: one of careful capture, and attention to detail and the creation of the finished image, and that’s the reason those images stand the test of time.
If you can’t be bothered reading my word-vomit (not an unreasonable stance to hold), this is the contents:
This isn’t just a post about editing, as much as it is about the idea of “truth” in an image, because the whole industry seems to be in a little state of confusion at the moment, and left right and centre we’re hearing “authenticity” and “truth” screamed from the mountain as objective poles at the top of a single summit.
Actually, it’s been in this state of confusion for the better part of 5 years to my eyes, or as long as I’ve been invited to talk about the identity crisis of the whole “authenticity” thing with my big fat mouth.
We’re not in the business of “truth” or “authenticity”, we’re in the business of nostalgia: whatever truth we think is in an image is going to be interpreted differently by the person looking at the image, or the person that’s in the image, and that itself is going to change in 5, 10, 20 years as details get forgotten or change shape.
As soon as we frame an image, we’re excluding what’s around it, and that process of putting ourselves into the image is something we can’t avoid even until we send the final files off.
So our job is to be there and give to what’s in front of us, and give ourselves the best chance to make the most amount of future nostalgia for the couples.
Just look at any Magnum gallery, which is (rightly) considered the yardstick of photojournalism, or for a more prescriptive example, the Steven McCurry photoshop scandal, which gave a bad name to editing, while then distracting from the fact that it’s a very necessary part of what we do and what he does, and that the slamming was mostly unwarranted.
(But… maybe he could’ve just cleaned it up a little more).
So from an editing point of view, the things I’m looking for as a judge are the level of care made in bringing that nostalgia to the highest standard it can be on a case-by-case basis, and how that level of care is restrained enough so that it still stands out as a photograph, and not a piece of computer art.
Editing isn’t everything, but it’s importance is downplayed and often tossed aside, and I think it plays a huge role in how we turn a moment into it’s best representation as a finished image.
What it comes down to is this: Are we gonna let a hunk of pixel-making plastic do the seeing, or our eyes and intuition?
Everyones got a DSLR, everyone can be a photographer. Nearly every photographer I meet is friendly, is invested in a great client experiences and uses down-to-earth in their marketing as a point of difference. So if everyone is creating good work and is equally good company, where does that leave us as more folks jump into the trade, and what are the parallels to making work that will stand apart in a competition?
There’s a whole bunch of answers that I’ll look into over time, but one thing that can’t be faked, is investing love and care into the craft of the finished images, and looking back to what it means to take a craft-based approach to the creation of the work itself.
This is a roundup of 4 wedding photo editing tips that can be thrown into your editing workflow to leave you knowing that your images are finished properly, and with love.
First up, let’s delve a little more into why I’m interested in this, and why this is important as craft-centred photographers: this classic James Dean image.
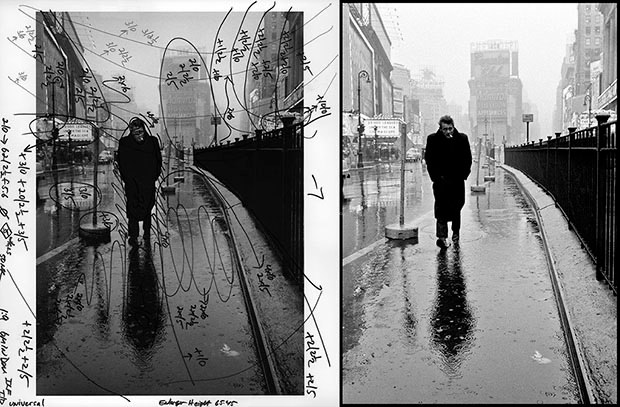
Taken shortly before his iconic star blew up, some of the words that come to mind mind from this Dennis Stock photograph are “simple”, “romantic”, and that feeling, on the tip of our tongue, that there was a little bit extra fantasy back in the day.
All of this rings true, but it does so because of how simple and digestible the image is – in it’s purest, most concentrated self – thanks to an experienced darkroom operator, Pablo Inirio, knowing where to take it.
Specifically – removing the deep-shadows from everywhere in the image except for James and the leading-lines of the curved fence.
How a camera views a scene, is one thing. How we feel a scene, is another. And thanks to camera manufacturers (understandably) indulging in a race to the top for perfection, we’ve given away a few traits that we now associate with analogue photography: ambiguity, imperfection, and anything just a little bit “off”, that we can’t put a finger on.
And the goal with any great image, should be to bridge the gap, between how a scene feels, and how the final image looks. It’s not popular to talk about this gritty technical stuff. It’s especially unpopular amongst professional storytellers, who might have us believe that gear and editing don’t matter, but they do, and have an enormous partnering impact on our voice and point of difference as photographers.
#1: Spotting
This is in the number one place, because it’s the single biggest thing I see constantly skipped by photographers, but at the same time, simplest technique to throw into our workflow.
That big header image draped across your website. Spotted it? If not, it might not be as strong as it could be, because while the person looking at it is trying to inhale the story and vibe you’ve created, their subconscious is distracted by all those little specks. I see it all the time, even on successful photographers portfolios, and it’s so quick to correct.
Not spotting our images is like being an opera singer and cramming sand in the audiences ears. Clean that stuff out: not only is that a very strange thing to do, but now no-one can hear what you’re saying.
Spotting is the gentle art of removing “spots” in an image that a camera sees, but that we don’t notice until it’s baked into the final image.
And I don’t mean skin blemishes, or stars: spotting means removing spots of (usually) hard-light that show up in an image caused by random sun reflections, or micro-textures that can subconsciously dominate a frame.
Spotting isn’t about distorting reality or removing things that should be part of the image: it’s about making an image easier for the viewer to consume, and easier to understand the heart of the image (we’ll deconstruct that esoteric clap-trap in just a minute).
It’s hard to understand the benefits of spotting, until we see an image that has had a simple 10-15 seconds of spotting work, against one that hasn’t. And this is the part where we get to decide whether this even matters. One can argue it doesn’t – this is for folks who like myself can justify going the extra mile.
We feel the extra simplicity and strength of a correctly spotted image, because there are less small little pieces of distraction that dilute the main message of the image. Spotting needs to be done because when we’re looking at a real-life scene through our eyeballs, our brain is able to filter out the little hard spots of light, as the scene moves naturally in front of us: but when we take an photo, those little imperfections are frozen, burned into the sensor, and take the centre stage in the final image, which to me is less real than proactively spotting them out, and having the purest version of the image.
Spotting your images is the quickest way to tidy things up and have a great, print-ready image.
Spotting an image is a simple exercise: “is this thing in the image lifting it up, or taking away from the story”?
A correctly spotted image of a Newport Substation Wedding – all of those hi lights aren’t adding to the story of the image, aren’t clear what they’re attached to, and are taking away from the power of the image as representing a gathering in a majestic room. So, off with their heads.
Lean back from the image, let your eyes haze, and let your hand wander with the stamp-tool – it’s remarkable how quick you’ll autonomously clear little specks from one corner of the image to the other.
#2: Dodging and Burning
Dodging and burning is the art of making something lighter (dodging) or darker (burning) in an image.
There are many reasons to dodge and burn an image, but start with the following as a foundation, and it’ll pretty much inform how and when you use this technique:
Dodging and burning is used to solidify a truth in an image.
I used “a truth” rather than “the truth”, as there’s no such thing as objective truth in an image: every image we make is influenced by our vision, what we include, and what we leave out, but we rabbited on about that already.
By having conviction in our own vision, we can make each image align with our own version of the truth in that image – this is something I also wrote about last year.
Whatever that truth turns into once we’ve given it over is then out of our hands.
Back to our dear friend, James Dean: the reward for investing a little elbow grease, is the reward of a classic image. How a negative and a camera-sensor interprets both light and the key elements of an image is nearly always at odds with how we interpret it as a human: the goal of thoughtful dodging and burning is to bridge this gap.
Bring up skin that needs to sing, burn out hi lights that are taking over the airwaves, and gently make it so that the most intense points of contrast are happening at the main “story” areas of the image.
And more importantly, ensure this is just augmenting and reducing the natural light play that is already happening within the image.
#3: Blemishes and wrinkles
My mantra with skin blemishes, is this: if it’s not likely to be on the skin after a week, then it can probably go.
This isn’t about creating unreality, or an unreasonable expectation of beauty: this is about showing up for our couples and putting in that little bit of extra elbow grease, knowing they’ll appreciate that little bit of extra work.
Here’s the other reason we clear blemishes and other kinks (within reason): the only reason we can see them, is because light is creating the shadow on them. And the biggest reason that’s happening, is because the light we’re placing someone in for a portrait usually favours the part of the portrait we connect with most (the eyes for example), and so everything else takes second place.
If you don’t believe me, put a beauty-dish, soft-box or some other highly diffused light directly in front of someone, and watch most of them disappear, as no shadows are created. Further, if someone is in the middle of an action that causes veins or other things to be augmented beyond how they regularly would, there’s no real reason for those to be taking centre-stage, so we should be happy to reduce them to simplify the image to the things that we want to be connecting with.
This can be done at the same time as the regular spotting pass.
Tips:
For spotting and blemish removal, I find the Lightroom healing tool too slow and clunky. So what I do is, after I have my final exports out of Lightroom, I open up the library of finished JPG’s in Photomechanic. From there, it’s a pretty quick exercise of tapping through the collection, and hitting “CMD+E”, which immediately opens the image in photoshop. Tap the “J” key for the spot healing tool, hit “CMD+S” to save, then “CMD-Q” to close the image, then “Alt+Tab” to go back to Photomechanic. Practice the routine, and you’ll have the most efficient way to go over that final pass at your fingertips.
#4: Find the feel
How did the scene feel, and how can you bring that out? Sometimes just asking this question will lead the edit down a path of it’s own, all by itself.
If composing in the moment to make the most of the situation wasn’t possible, then correcting course in the edit is nothing to be ashamed of.
This is just a general note to keep in mind whenever looking at an image, and in most cases by just asking the question of “how did this feel when I was there”, the small, gentle tweaks required to tell the best possible story of that image become self evident pretty quickly.
Some final words.
Now, if we’re delivering 1000 images for a wedding, it’s an insane proposition to spend 10 minutes on every single image, and not viable, unless we like the idea of not paying our rent and delivering our images to our clients 3 years after their day.
Some of these principles (spotting, etc) can be applied to nearly all the coverage. But these are mostly for the images where there’s a little something else in them that begs to be brought out. You always know it when there is, and it’s always worth spending that little bit of extra time: for you and for your couple.
We get to decide whether we’re going to be hands-off in our editing process, let the camera do the seeing, and let some arbitrary idea of “truth” be the driver. And maybe that’s ok.
Or, we get to impart a little bit of the original magic of photography, recognise the value of truth-bending and white-lies as a way to creating something that ironically creates a better and more relevant truth, and how through that, we give the people receiving our images a little bit of magic that comes closer to how it felt.
To see occasional image-edit time lapses, follow my instagram.
A live-edit with Luke, founder of IWPOTY
If you take away just two things from all of this wedding photo editing tips gassbagging, it should be these points:
- If it isn’t lifting it up, it’s bringing it down
- Don’t add what isn’t there, augment what is there


